Thanks Ian - will have to wait for the re-metalled con-rods to arrive before I sort out the machining (have bought re-metalled con-rods through this forum). I think that I now have a better unerstanding of the process - not straight forward!
Engine is on hold so have started with the brakes - all 4 drum look quite good inside (no lip - suspect re-bored), BUT they all have a band/strap fitted around them? Also spacers fitted to the shoe ends that sit on the 'cam'. Drums look OK - but wondering if the strap is a 'fix' for a drum that has been machined a 'lot'. Anyone seen this before?
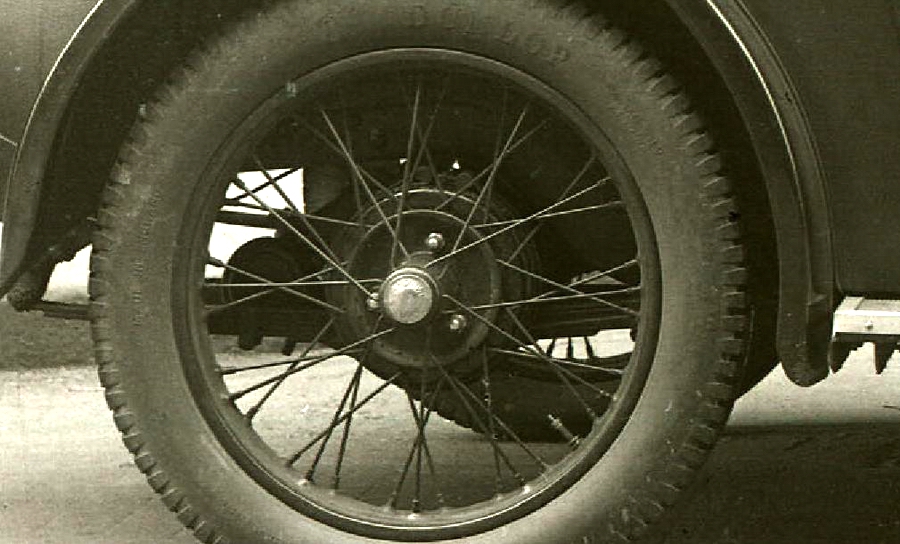
brake drum.jpg (85.64 KiB) Viewed 2673 times
brake shoes.jpg (172.25 KiB) Viewed 2674 times
There is quite a lot of wear on the shaft of the brake cam; there is a split copper 'bush' - looks like a bit of 15mm copper pipe! - will need to repair/re-make + re-bush the shaft.
Also some strange lead, half-moon weights fitted to the brake shoes with spring-loaded pins?
The steel bands are a home-made anti-squeak device. Similar bands were available pre-war, but were more professionally made than yours! They should be fitted with a strip of rubber underneath them. I recommend you remove them and see if your brakes actually squeak when refurbished! (They have noting to do with the drum skimming.)
The lead weights and springs are also an anti-squesk device - M Types were fitted with these as standard - but their weights had 'MG" cast into them, so, again, i suspec that your were home-made at some point in the past.
As for thre stgeel caps on the ends of the shoes, these are original - provided that they are folded and keyed into the aluminium of the shoe. When brakes became worn, owners sometimes added extra steel or even welded new steel onto the original caps.
As for the brake cams, these always suffered from bad wear, because greasing was often neglected. I recommend you order new brake cams, bushes and cotters from Mike Dowley (01939/210458) - same as M Type.
Here's an image of an anti-squeak band fitted to the rear offside brake drum of the prototype Minor Semi-sports. The photo was taken in the autumn of 1930.
The ends of the band are looped and riveted, and retain a pair of steel barrels, drilled and treaded with left/righ handed threads. Connecting the barrel is a double-ended stud with matching left/right threads and a hexagonal section in the middle to facilitate tightening or loosening with a spanner. I have come across several such bands in the past.
I also have a drum with a solid steel band around it. I always assumed it was an anti-squeal device - it certainly doesn't look homemade. Regarding the bearings for the levers, if you are lucky and no-one's got there before you, you will find the pivot pins also have the brass bearings. This means you can swap the backplates from one side to the other putting the pivots in the old bearings.
Thanks Ian - I did wonder about that! - I will go and strip out the pins now {snow means that I at home - an opportunity! } - what I am worried about is that on the front two backplates, the brake cam 'housing' is loose on the backplate. I am assuming that these are just pressed together to sandwich the backplate - any tricks for securing, without welding?
This is a common problem. You could try centrepunching them, but a better fix is to have them brazed (but press out the bronze bushes first. Also take care to braze them dead square with the backplate - otherwise the brake shoes may not sit flat on the cam.
I have tried 3 chassis including one that looks bent, all measure 18 3/4" between rails measured just behind dumbiron on the top innermost part of chassis channel section. Alternatively 21 1/2" to front outside edge of dumbiron excluding the raised lugs that locate the shackle pin....
Good luck with your brakes, I am still trying to get rid of an intermittent graunch (over 2 years of use), so fierce it throws your foot off the pedal, and have tried skimming drums, adding brake bands, new linings (2 different types), packing shoe ends, new pulleys and cables, refacing adjuster nut, replacing cams and backplates. No-one seems to have had the same problem so it can't be an inherrent design fault.....
I too have an old set of shoes with sprung pins through them but no weights. The pins seem to be designed to go through the back plates (once drilled to suit). This seems to have been done to try and stop shoe wobble and became a standard design on later hyraulic systems but with a post fixed to backplate and slot in the shoe, not sure how this works with the modded design;- if the pin is secured when the shoe moves it will pull the shoe towards the backplate. If all else fails I may resort to doing this as well, or bolting a post to my backplate and slotting the shoe!
Thanks Toby - I got it right (+ or - a little bit !) - as I am working on the brakes I discover one drum with a bit of a flat ground on it; then I notice that the front backplate, on the side that had the 'bend', had a bit of a flat ground on it -- assumption; wheel fell off! sometime?
So the brakes are not easy? What I am a bit confused about is adjustment. I can see how it is possible to ballance the cables + adjust individual brakes via cable adjustment, but I did expect that there would be some way to adjust the shoes up to the drum other that rely on the cams/cables? i cannot find any shoe adjusters, unless the pivot pin is ecentric?
Have you managed to sources new springs (shoe)? + linings?
The only adjustment you have is the four cable lengths and the pedal to brake cross-shaft rod.
Here's the brake adjustment data from the 1933 Operator's Manual:
All Morris cars have their brakes properly balanced and adjusted before they leave the Works, and all Morris Dealers have instructions to see that they are properly adjusted before the cars get into the hands of owner-drivers. During the first 500 miles, however, the maximum braking power may not be available, and adjustments may have to be carried out by the owner in order to take up the natural surface wear inevitable with new brake linings.
Brake adjustments are of a very simple nature, and take the form of a main adjustment by a wing nut situated at the end of the brake pedal pull rod. This adjustment is revealed by removing the floorboard just in front of the driver's seat. Tighten-ing up the wing nut will cause all four brakes to be taken up simultaneously.
It is important with any system of four-wheel brakes that the pressure on all four wheels should be equal-that is to say, that when the pedal is depressed one wheel should not be braked more than is another, and therefore the careful owner will, after the first 500 miles, carry out the following procedure.
Some blocks of wood or bricks of such a size that they will support the wheels clear of the ground should be obtained. Each wheel in turn is then jacked up, the blocks being placed underneath the axle (thus leaving the jack free to carry on with the operations on the other wheels). When all four wheels are clear of the ground they should be turned one by one, and nuts on the corresponding brake cable be screwed up until the shoes can just be heard rubbing on the drum when the wheel is revolving. Each nut should then be slackened back one full turn and the brake on that wheel will be properly adjusted. This should be done to all four wheels in turn.
If when on tour (or almost at any other time during the life of the car) the foot brakes should require adjustment, this can very simply be effected by means of the wing nut previously described. Do not forget to take up the wing nut adjustment of the hand brake a like amount whenever use is made of this main adjustment, or you may find your hand brake ineffective.
It is important that during the life of the car the oiling nipples on the brake countershaft should receive a proper charge of oil at intervals of 500 miles.
Should the brakes not be satisfactory at any time it is always as well to ascertain that they are operating freely inside the brake-drums, as although every precaution has been taken in the design to exclude dirt and wet, it is still possible after continuous running in bad weather to have some trouble from this source. To ascertain if this is the cause it is necessary to disconnect the cables at their junction to the brake camshaft levers and see if these levers can be easily applied by hand. If not, remove the brake-drums as detailed in the following paragraphs, and thoroughly scrape out and oil cams and clean camshaft bearings until they work quite freely; then reassemble the brake-drum, reconnect the brake-application cables and readjust. All this work should never become necessary unless the brakes have been previously neglected. We give this information, however, in case it may be required.
Brake-shoes
Removal of the wheel will reveal three countersunk headed screws between the wheel studs. Withdrawal of these screws permits the brake-drum to be drawn off the wheel studs, thus exposing the brake-shoes for examination. Should the brake linings require renewal, the brake-shoes can be removed by un-hooking their return springs. This is best accomplished by passing a length of stout string through the end of the spring, which can then be extended sufficiently to permit of its being passed out of the eye on the brake-shoe.
Complete sets of brake linings and the necessary rivets can be obtained from your local Morris Dealer or from the Works at Cowley. When replacing the brake-shoes, care must be taken to see that they are replaced in the right position. The spring eyes are not quite in the centre of the shoes, but are offset. The shoes should be replaced so that the spring eyes are on that half of the shoe which is towards the centre of the car, or the springs may foul the wheel stud bosses at the back of the hub flange. It is a good plan to mark the shoes before removal so that they may be replaced in the same position.
If faulty functioning of the brakes is due to grease from the hubs having found its way on to the brake drums and this is not due to over-greasing of the hubs with the gun, it is probable that the felt oil-retaining washer is faulty ana requires replacement. Since this entails removal of the hub and the use of special extracting tools, rectification of this trouble should be entrusted to the nearest Morris Dealer.
(The rest of this manual can be found in the Members' Area of the website - under the Gren Strickalnd archive link.)
Having read the bit about jacking up all four wheels, I prefer to adjust the brakes on the road. Take the car for a short trip up the lane and apply the brakes a few times. Then feel the warmth of each drum. Slacken off the warmer ones, tighten the colder ones and repeat until all four brakes are equally pulling their weight. Then repeat every few hundred miles, or as necessary.
You can obtain all the parts you need from Mike Dowley at Sports & Vintage Motors (01939/210458). He has brake cams and cotters, fulcrum pins, bronze bushes, pull-off springs, linings and rivets. (Please mention the VMR when calling S&V - Mike is a long-time sponsor of the Register, and we could not run our cars without his parts support.)
not sure if I would like to be anywhere near that car when it is on those chocks! - while I am picking your brains; should there be a washer between the brake cam and the bush? only one out of the four bushes had the raised flange left on it. The others had straight bushes + washers.
John, the bushes should be flanged - and therefore pressed in to the hilt of the flange, with the flange on the inside so it acts as a bearing surface for the brake cam.
I knew that taking things to bits quickly means that they go back together slowly! - which of these pulley assemblies fits the drivers side, and which one is for the passengers side? the multiple holes are a bit confusing!
i can recommend ians method of brake adjustment. spent an afternoon with a pre war bentley and mg owner trying to cure the noises, he laughed at the drum temperature on the road method. we set them up in the garage upon his insistance that it was the best way and then had to do it on the road to get it right, he called it primitive! I laughed!
I do look forward to getting to the adjustment stage! This front chassis pulley; if I fit it as per photo below, I can get a good cable runs + all 4 holes will match pulley/chassis drillings - but I am sure that it was/should be positioned further back?
front cable run.jpg (44.86 KiB) Viewed 2482 times
The front pulley blocks that pivots from the trunion have thick pulleys with 1/4" hole. The centre pin is riveted and brazed to the two pieces of steel plate that form the 'block'. On one side, the end that pivots on the trunion is separated by a spring; while on the other side the plates are spaced with washers. I assume that the block should comprise two plates, perhaps welded, to a spacer {thinkness of pulley + a bit} and drilled to pivot on the stud that comes out of the top trunion? the pulley then rotating on a clevis pin {retained with split pin} ?