IA 9142
Moderators: Ian Grace, Will Grace
Re: IA 9142
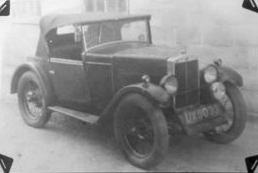
Talking of Semi-sports, I just received this photo (i'll be getting a better copy) of a Shropshire-registered (in late 1931) Semi-sports from an earlier owner.
-
mike houston
- Posts: 101
- Joined: Mon Dec 01, 2008 9:41 am
Re: IA 9142
A few more photographs.
Mike.
Mike.
- Attachments
-
- Ssports 003.jpg (57.33 KiB) Viewed 2473 times
-
- Ssports 002.jpg (58.28 KiB) Viewed 2469 times
-
- Ssports 001.jpg (56.78 KiB) Viewed 2469 times
-
mike houston
- Posts: 101
- Joined: Mon Dec 01, 2008 9:41 am
Re: IA 9142
Time flashes by, thought I would do another post! Enquiries through the Irish DVA show that the car was first registered by a David Edgar in Antrim on the 2nd March 1931. He last registered it in March 1959, suggesting an ownership of nearly 30 years. This could of course have been longer if he then laid it up. This now leaves me with a potential gap in the history from 1960 to 1970. I have already started a contact with the family, and hope to learn more.
With the car came a raft of spares including an engine, (the number of which is 200 away from the saloons!), a gearbox, a front axle with backplates, an original cut-out, various lamps, brackets etc. In order to take a break from the saloon body I decided to start to strip both engines to see which best lent itself to restoration. It quickly became apparant that the 'new' spare engine, (bought from Harry Edwards as a 'good runner') 25 years ago is the better one. The only real fault I have yet found is a broken front bearing housing cover (engine mount), and a whole load of sludge and gunge in the sump. (The saloon engine has run the side of the no2 big end bearing). The white metal bearings all seem sound enough, but the large main bearing seems a bit 'crunchy' and will have to be replaced. Anyway all the main components are about to go off for a deep clean, and a professional check of the clearances. I'm hoping to reuse most things, including the +40 pistons as there seems to be no bore wear, but it would seem sensible to replace the rings? So I'm looking forward to paint and reassembly. If anyone can advise me of any little mods that can be incorporated, (apart from the external filter which I have read up on and am undecided about). For instance it seems logical to replace the small tail bearing with a sealed one. Are there any other mods that will help to reduce the chance of oil leaks?
I must get back to that body, regards to all, Mike.
-
mike houston
- Posts: 101
- Joined: Mon Dec 01, 2008 9:41 am
Re: IA 9142
I forgot to attach these two pictures,
Mike.
Mike.
- Attachments
-
- engine rebuild 035.jpg (147.98 KiB) Viewed 2346 times
-
- engine rebuild 034.jpg (152.37 KiB) Viewed 2344 times
Re: IA 9142
Hi Mike
From your report and the photos this looks like an excellent starting point for a good engine. I'm not sure the sealed tail end bearing is necessary, as if you have oil in front of it, it must have come back through the taper, and this wouldn't be good news! I can tell you that you really need to seal the plug at the rear end of the oil gallery in the block very well and wind it up tight. Other than that, I don't know of any engine mods at the back end to reduce the risk of oil seepage, although there was a mod to the gearbox input to the gearbox which are noted in the Service Sheets to prevent gearbox oil seepage.
Good luck and keep us posted. Is the engine out of the Semi-sportsd at present?
Re: IA 9142
Hi Mike,
Don't forget to take the plugs out of the crankshaft, a lot of sludge collects inside. Sometimes they need to be drilled out.
Good luck,
Ian
Don't forget to take the plugs out of the crankshaft, a lot of sludge collects inside. Sometimes they need to be drilled out.
Good luck,
Ian
Re: IA 9142
Hi Ian,
I have a reground early crank, 1929 (parallel flywheel flange) which appears to have core plugs fitted to the oil drillings. Do you know if this is original or are they a replacement for threaded plugs. Thanks.
I have a reground early crank, 1929 (parallel flywheel flange) which appears to have core plugs fitted to the oil drillings. Do you know if this is original or are they a replacement for threaded plugs. Thanks.
Re: IA 9142
Interesting, Simon. The later cranks had plugs with tapered threads and square female socket holes for fitting/removing. I have not seen the core plug type you describe. Could you post a photo?
-
mike houston
- Posts: 101
- Joined: Mon Dec 01, 2008 9:41 am
Re: IA 9142
The engine rebuild continues, the block is away at the moment for a +60 rebore, the crank is being reground and the con rods are to be remetalled. The plugs in the crank will be removed for cleaning. Remarkably the rear bearing and flange are OK ! Incidentally Ian, the plug for the rear gallery was held in by a locking device, I've attached a picture and will heed your advice for reassembly.
With most of the engine away I've had a look at the oil pump and the clutch. One pump had nearly new gears, but the relief valve plunger was nearly seized and took some shifting. A spare plunger is going in and I suppose I ought to get another spring? The clutch is a bit perplexing beacause the original pressure plate is of a diferent pattern to the spare that I have. This seems altogether stronger, I hope the picture explains better. I can't see any reason not to use it, can anyone else? (and does anyone know where it came from). I thought I would also include a picture of two of the operating levers I have. As you can see these range from the nearly new to some which must be on the point of disintegration! The clutch plate was badly scored, but the recently obtained pile of spares has turned up what looks to be a new one with just surface rust.
I'm now looking forward to assembling it all. I won't take the s/sports engine and box out until this and another box are ready to go in.
Regards to all,
Mike.
- Attachments
-
- The gallery plug locked in place
- engine rebuild 037.jpg (59.36 KiB) Viewed 2231 times
-
- The original is on the right, is it OK to use the other?
- engine rebuild 038.jpg (54.4 KiB) Viewed 2223 times
-
- Two different profiled clutch levers!
- engine rebuild 040.jpg (59.58 KiB) Viewed 2221 times
Re: IA 9142
Hi Mike,
Thanks for the update and pics. I really like the locking plate mod. for the oil gallery plug.
Re the different clutch plates, I suspect that they are interchangeable, the stronger one being a later version, or even an aftermarket item from Remax, Brivec, etc.? The only time I have noticed two different variants of the clutch plate is when I found one that did not have the steel thrust buttons attached - or even any holes to attach them. From this, I presume that the very early plates didn't have the buttons (which take the thrust from the three hardened steel thrust pins), but the need for a mod. would have become evident quite quickly as it wouldn't take very long for the hardened pins to mash the ali.
Keep up the good work.
-
mike houston
- Posts: 101
- Joined: Mon Dec 01, 2008 9:41 am
Re: IA 9142
While waiting for the engine block to be returned I got on with overhauling the clutch. I have just rivetted in the new linings and changed over the clutch fingers. Interestingly these are a little deeper at the point where the adjustment screws go through, however the new thrust pins are a little longer so I think the overall effect is the same. I have also inserted new thrust buttons into the pressure plate. New clutch springs are to be used which are certainly longer than the old ones, which I guess settle with age.
A couple of days ago I gave Terry Synott a little help with his engine rebuild by hanging onto the flywheel while he tightened up the main nut! Terry had made up an ingenious device from wood with a long handle which bolted to the flywheel to counteract the necessary turning force on the nut. Anyway we got it up to about 130ft/lbs, which should prove adequate. The engine is looking good and Terry is approaching the rebuild very methodically and carefully.
I'm now looking for another job to do until the engine is returned, I might have a look at the distributors I have got and try to figure out which is best and what I can do with it!
Regards to all, Mike.
- Attachments
-
- clutch now ready for reassembly
- engine rebuild 005.jpg (55.98 KiB) Viewed 2174 times
-
- After the wooden lever was removed and nut tightened
- Terrys engine.jpg (58.84 KiB) Viewed 2172 times
Re: IA 9142
Looking very nice Mike. It will be great to have another Semi-sports out and about next year. Where did you get those segmented clutch linings?
-
mike houston
- Posts: 101
- Joined: Mon Dec 01, 2008 9:41 am
Re: IA 9142
The clutch linings came from S&V,
Mike.
Mike.
Re: IA 9142
Interesting - looks like they must have a new supplier since I bought my last set from them.
-
mike houston
- Posts: 101
- Joined: Mon Dec 01, 2008 9:41 am
Re: IA 9142
At last some engine progress to report. The block, crankshaft and rods have just been returned from Pigsty Racing. The block has been rebored to +60 and thoroughly cleaned. The crank had the caps drilled out and the oilways completely cleaned, some needed to be drilled as the debris had gone solid! New caps of the same material were screwed in tightly. It was ground and then John Kirkby of Croydon remetalled and machined the ends. A new set of pistons have come from S&V and the rings have been gapped. Interestingly the old big end bolts/screws had all stretched and were probably close to breaking. The new set are to racing/aircraft spec to be secured with k-nuts. Unfortunately the return has coincided with sub-zero temperatures and a freezing garage , so some assembly is taking place in the kitchen. Various ancilliaries have been cleaned/painted or replaced, and I hope to have the whole assembly together by the Spring and into the s/sports. Well that's the plan! The pictures are hopefully self-explanatory. The colour of the block is being painted MG maroon. I like the colour and it looks period, also any oil leaks should show better than on black!
Regards to all, Mike.
Regards to all, Mike.
- Attachments
-
- First coat of maroon over two coats of acid etch primer
- engine rebuild 044.jpg (55.88 KiB) Viewed 2081 times
-
- You can see two of the cleaned oilways and one of the new plugs
- engine rebuild 043.jpg (59.66 KiB) Viewed 2079 times
-
- block with pistons in place
- engine rebuild 042.jpg (58.91 KiB) Viewed 2082 times