Looks good Tony. Which chassis is this destined for?
That vertical timber that rises from the aft end of the wheel arch inner to the double-curved longitudinal rails needs to be perfectly vertical - in the pic it looks like it might be chamfered off a little at the top? The reason it needs to be vertical is because it supports the sheet metal side covering and you don't want any compound curves in those panels. I took care to position the longitudinal members so they were perfectly above the wheel arch - does that make sense? If not, I should have a pic at home of my frame. But then again you should be able to check out KJ.
Yes , KJ is forming the "pattern" for this body. KJ is complete, and whilst this is good in many respects it is not possible to take any individual parts off to use as direct patterns , which does prove difficult for the compound curves on the top rails.
I have made one or two "modifications" to the compound curved rails to enable an unskilled woodworker to achieve the same end product but without the complexity of curving individual pieces in two directions ! We shall see !
The vertical posts you mention , Ian , are chamfered towards the top , which is identical to those on KJ. I will examine this later , following on from your comment re the sheet metal underskin.
You ask , Ian , which chassis this is for. At the moment I am planning on putting together a "kit" which will include this body and all relevant ancillaries , together with the V5C for FD 6409 , and will advertise it later in the year to anyone who want a project to finish off !
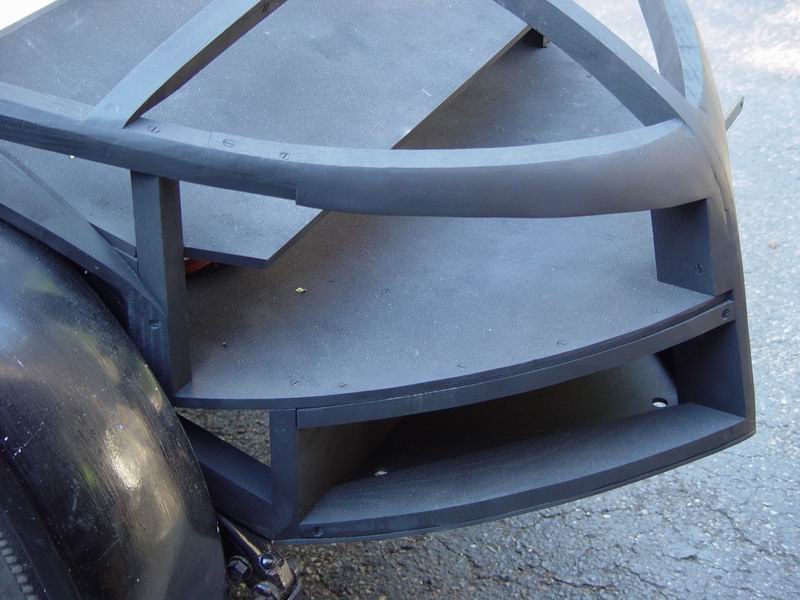
Here is a closeup of the Bed-Pan. I was lucky enough to have the original timbers to copy, but even then it was a nightmare trying to get this rail spot on - took a few false starts. I don't blame you for cutting corners (if you will forgive the pun!), but there might be some forehead slapping awaiting when you come to try to skin the tail!
This photo highlights another tricky spot - it is at the rear end of the wing/wheel arch. You can see in this photo that because the inner edge of the wing is rounded, then there is a triangular shaped gap where the inner wing leaves the body. When you come to fabric the car, this looks ugly, and the wing piping is too thin to be any real help. I think I ended up stuffing the fabric in this area with extra wadding, but if I did another one, I would make a natty little ash fillet and fit it in there. I'm not entirely sure how Morris dealt with this, but suspect that there actually was a hole in this area.
Very impressive indeed. A couple of questions if I may, firstly did you use a local North Yorkshire supplier for your ash and secondly what type / size of bandsaw are you using to cut the sections, presumably not the small Clarke in the background. Oh and thirdly did you steam bend the wheel arches - if so, how easy / difficult was that?
The reason for my asking is that in the not too distant future I hope to build a van body on a 34 Austin 7 chassis that I have, the challenges will be similar to those you're facing.
The source of Ash was from a contact in a small village , Normanton on Trent , near Newark where I visit fairly regularly in connection with my work. They provided planed, straight sections to my specifications which I cut on the Clarke's Bandsaw which you spotted in my garage !! I did have to get two hefty pieces cut at a friends house as 3" thick is as much as the Clarke's will cope with. A new blade works wonders though , even on this machine.
The curved wheel arches are laminated 4mm birch plywood , four layers , using every available G clamp I could lay my hands on ! [ I even brought a valve compressor into use here too !! ] . The glue I used only took 24 hours to set fully and it was superb. Evostick , in a green plastic container.
If you need any further help ot advice pleasee ask.
PS. This is my first attempt [ and probably last too ] at this sort of thing , and I am no professional at woodwork , so anyone with a lot of patience could do the same.
All the wheel arches I have made have also been ply laminates exactly as Tony described. I had a sturdy jig and used about a dozen G clamps to clamp the glued layers to the jig. Use Clingfilm over the jig so the wheel arch doesn't glue itself to the jig! Make sure you use waterproof glue. Once the glue is set, you can then run the whole thing through the bandsaw to put the outside profile on it. Just double check before cutting to make SURE you don't end up with two left hand or two right hand wheel arches! I wish I had a pound for every pair of timbers I have cut and then found I had two of the same hand!