Mike,
I use a glass & mesh re-usable filter in the Saloon. I empty its contents once a year and am always amazed at the amount of 'crud' it stops from entering the carb.
Chris
VG 3260
Moderators: Ian Grace, Will Grace
-
chris lambert
- Posts: 541
- Joined: Sun Nov 19, 2006 8:06 am
- Location: Suffolk. U.K.
- Contact:
-
mike houston
- Posts: 101
- Joined: Mon Dec 01, 2008 9:41 am
Re: VG 3260
Chris, Halbe, Ian,
Thanks for your prompt comments. I should have made it clear that the seals were well soaked before use, and then dripped for a while after each hub nut was tightened! This has now stopped. It did however strike me that they might smoke, or even catch fire, until they are 'bedded in'! However I have seen no reports of it happening. I like your idea of the glass bowl/filter Chris, and will probably adopt that . I hope to see you Chris at Beaulieu on the Sunday,
Regards to All,
Mike.
-
mike houston
- Posts: 101
- Joined: Mon Dec 01, 2008 9:41 am
Re: VG 3260
I can't believe that another month has passed since I last posted, so here is an update. The chassis is now rolling with operational brakes and steering, see picture below. I then decided to turn my attention to the body, which clearly has a lot of problems. I started by removing the scuttle and the windscreen surround, revealing 80 years of 'repairs' , rust and (more) worm. The car body is now on it's back in order to get at the underside fastenings. When it is upright again, and before I undo the rear panel completely I will brace the frame up with angle iron, and take loads more pictures and measurements. I don't believe there will be too many original frame parts left when I have finished, but I will retain any sound pieces, (and try to replace one piece at a time to maintain structural integrity). I'll keep you posted on that! At least I have just found a sawmill less than a mile from my home who has a stock of seasoned ash. I never knew it was there until a week ago!
The job won't be made any easier because at some time the roof was all closed in, presumably to make it watertight. Thanks to obtaining the roof irons from Tony Gamble I should be able to return the frame and opening to original spec. Chris Lambert has kindly supplied some photos of his roof in order to assist, but if anyone out there has plans, dimensions etc of the frame, and particularly the roof opening, I would be very grateful. Also, and this is a long shot, if anyone has any decent panels from a coachbuilt saloon I would be very interested. I think I am going to be spending a lot of my pension at my local body shop, who fortunately specialise in old machinery, but charge for it!
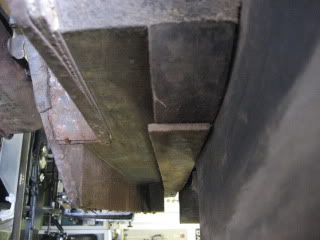
Anyway the pictures should round off the update. The three slots below the screen are interesting. At the base of the screen surround panel are three tabs welded onto the reverse. They pass through these slots and are then bent down and pinned. Only one was intact when I got to it.
Regards to all, Mike
The job won't be made any easier because at some time the roof was all closed in, presumably to make it watertight. Thanks to obtaining the roof irons from Tony Gamble I should be able to return the frame and opening to original spec. Chris Lambert has kindly supplied some photos of his roof in order to assist, but if anyone out there has plans, dimensions etc of the frame, and particularly the roof opening, I would be very grateful. Also, and this is a long shot, if anyone has any decent panels from a coachbuilt saloon I would be very interested. I think I am going to be spending a lot of my pension at my local body shop, who fortunately specialise in old machinery, but charge for it!
Anyway the pictures should round off the update. The three slots below the screen are interesting. At the base of the screen surround panel are three tabs welded onto the reverse. They pass through these slots and are then bent down and pinned. Only one was intact when I got to it.
Regards to all, Mike
- An unusual view of a coachbuilt saloon!
- DSC03124.JPG (144.12 KiB) Viewed 3420 times
- Attachments
-
- Rolling again, but now in the back of the garage.
- DSC03110.JPG (144.71 KiB) Viewed 3419 times
-
- Note the three slots.
- DSC03119.JPG (149.43 KiB) Viewed 3420 times
-
mike houston
- Posts: 101
- Joined: Mon Dec 01, 2008 9:41 am
Re: VG 3260
Well after a couple of days entertaining grandchildren, gardening etc, I was back in the garage this afternoon. Four hours later and having removed about 120 tacks, nails and screws I was able, with the help of youngest son, to remove the entire rear body panel. The frame ignored the fact that I had braced it in what I thought were the crucial places, and largely fell apart at the back end! What I had overlooked was the fact that joints could well come apart, and about six did. On a positive note they did so fairly cleanly, and saves me the trouble of taking them apart. I did notice that the joints where screws go into endgrain were most prone to fail, although general rot didn't help either! Anyway it looks likely that I will have to rebuild the frame from bottom up, so it would seem sensible to mount the main side rails onto the chassis to at least provide fixed datum points, and work up from there. Does that seem sensible, or are there any better ideas out there? I attach three pictures of the carnage, I think I now need a period of rest and quiet contemplation! You may not hear from again for quite some time!!
Regards to all,
Mike.
Regards to all,
Mike.
- Five minutes after removal.
- DSC03132.JPG (143.11 KiB) Viewed 3390 times
- heavy cord holding it together
- DSC03133.JPG (143.4 KiB) Viewed 3390 times
- The body raised up out of the way
- DSC03135.JPG (153.69 KiB) Viewed 3390 times
Re: VG 3260
Hello Mike,
Why not get a chassis from Toby and use that for your body restoration
It would also leave your own chassis nice and clean.
Regards,
Halbe
Why not get a chassis from Toby and use that for your body restoration
It would also leave your own chassis nice and clean.
Regards,
Halbe
-
mike houston
- Posts: 101
- Joined: Mon Dec 01, 2008 9:41 am
Re: VG 3260
Halbe,It's an idea that I will give some thought to. At the moment there is a lot of planning to do before I start the woodwork phase of the restoration. I am of course following your progress on your VG with interest, and I look forward to seeing how you get on with the woodwork, (I would hope the frame is more solid than mine!)Best regards, Mike.
Re: VG 3260
You're a brave man! Good luck. At least you appear to be methodical and do bear in mind that worse cars have been done before! 
if it's got wheels or chips - it'll cost you dear
Re: VG 3260
If i were going to advise anything, i would say, get the chassis, (or another) into the garage, and place it on axle stands or blocks and get it level, i mean level with a spirit level...... that way, anything you do from then on can also be checked for level, it's surprising how much difference a flat tyre or weak spring can make to the levelness.....then place the side rails onto the chasiss, and line up the holes with the holes in said chassis, and work your way up... if the doors don;t need rebuilding, make sure they fit regularly.....
Also, i suspecty that most of the screws into the end grain failed due to rust on the screw, so stainless ones could well be worth it...... i'm also not sure wether it's best to glue the new frame together or not, if it's glued and it flex's, it may break a joint.... if it's not glued it'll flex as it would have from new, i'm pretty sure they weren't glued from the factory....
Oh, a good bandsaw will pay dividends...!!! and plenty of patience, remember, measure twice, cut once...LOL!!
Good luck!!
Re: VG 3260
I'd concur with all of Ronald's comments. Once you get the sills on the chassis, then the job of building in the floor can be very satisfying - no complex joints or curves - lots of 1/2" ply (use SRBP - has to be waterproof - marine ply is OK but very splintery when you come to cut it. SRBP is more expensive, but has more plies and is a dream to work with by comparison) and straight ash members, including the cross-support assembly under the front seats, complete with toolbox, etc.
Minor bodies, and especially saloon bodies, have the tendencey to sag in the sills because they are only supported by the chassis on their inboard edges, but the weight of the body (including all that heavy glass), bears down on the A and B posts which are jointed to the outboard edges of the sills. The cross-box assembly under the front seats isn't really man enough ti hold the sills perfectly level for decades, so I experimented on my Semi-sports by adding a length of stout angle iron bolted across the body under the tool tray which is behind the bench seat on the 2-seater. I think a similar, unobtrusive mod. could be made to saloons - and would only be visible inside the toolbox. I'd be interested to know if anoyone else has ever made such a mod to a Minor body?
Minor bodies, and especially saloon bodies, have the tendencey to sag in the sills because they are only supported by the chassis on their inboard edges, but the weight of the body (including all that heavy glass), bears down on the A and B posts which are jointed to the outboard edges of the sills. The cross-box assembly under the front seats isn't really man enough ti hold the sills perfectly level for decades, so I experimented on my Semi-sports by adding a length of stout angle iron bolted across the body under the tool tray which is behind the bench seat on the 2-seater. I think a similar, unobtrusive mod. could be made to saloons - and would only be visible inside the toolbox. I'd be interested to know if anoyone else has ever made such a mod to a Minor body?
-
mike houston
- Posts: 101
- Joined: Mon Dec 01, 2008 9:41 am
Re: VG 3260
Toby, Ronald and Ian, everybody,
Thanks for the comments. I must admit I hadn't picked up on the 'levelness' angle, and might have relied on it sitting straight on it's newly tempered springs! So that's an idea I will certainly adopt. I will probably stick with marine ply though (as well as lots of ash), I can't really get my head around using a space-age material in an 80 year old car! However Ian I will be using the angle iron method to reinforce the cross members and thus beef up the sill support. I saw Terry Synott's car in the early stages of restoration back in March, a four seater tourer, and he has adopted this method very neatly and unobtrusively. I will be very happy if I can match his standard of workmanship! In fact I am hoping to see him again soon to clarify a few jointing methods that I am unsure about. Incidentally he let me have a peek at your Semi-Sports in it's palatial accommodation, needless to say I was very impressed!
One other thought concerns the use of glue which Ronald mentions. Like him I was led to believe that it was never used originally, and hadn't intended to do so. However it does strike me that there might be certain joints where it could be used to give added support. I don't suppose there are any definitive answers to this conundrum?
Regards to all,
Mike.
Re: VG 3260
My personal view is that a well cut, tightly fitting joint is better than a glued one, to allow very slight flex.... but if anyone knows knows different then i'd be happy to hear other options...... it'd be interesting to know what the proffessional ash frame makers do......
Re: VG 3260
Hi Mike,
SRBP isn't space age - just the Synthetic Resin that holds the Plies together. It is much closer to the original ply (which was Birch) than marine, which I think is only 5 ply?
Glad you like the Bed-Pan! I just sent the V5C to Terry today so he can MoT and tax it for the Summer Rally. However, I still haven't worked out how to get it to the Cotswolds yet - we fly in on Thursday, so have no time to get to Sevenoaks and drive it up, and I must admit it would be a bit of a flog from Sevenoaks round London. Any and all suggestions gratefully received!
Also, next time you see Terry, could you get some photos of his tourer? The last photos I saw of it were about 2 years ago before he really started work on it.
You may be interested to know that Terry and Roger Burnett (with the M Type Coupe) both entered their cars in the Boxing Day runs back in the early sixties, and both still have their cars. Terry is also a longtime friend of John Nagle and the mast Magazine had a pic of their two cars together back in the sixties in John's wonderful article.
Re: VG 3260
Mike, I don't knf this is encouraging or not but the bodywork you have is a lot better than I have on NG.
As a real amateur I don't have much advice to offer but I love working with Ash.
The only tip I can add to what you have is to make sure you have drilled your holes with the right size drill when you are about to screw things together as I have found that Ash does not give like softer woods and you ca easily snap a screw if you try to force it.
We will get there.
ATB
C
Re: VG 3260
Good point Clive. My regime is to drill a clearance hole and countersink the top piece of wood and then drill a pilot home in the bottom piece, if you see what I mean. That way you don't need to be a gorilla to screw the screw tight, and once it is tight, the head is flush with the surface. On some curved cross-section members in fabric bodies (like the elbow rail and door tops on the 2-seater), it is worth countersinking a bit deeper and then filling over the screw head with filler so that the screw isn't visible through the fabric when stretched over the frame.
And the only place I ever use glue is when laminating - like wheel arches.
I'd also recommend having a very large steel setsquare handy when assembling so you can make sure things that are supposed to be perpendicular actually are - like the wheel arch inner ply relative to the floor, etc. And don't ever be tempted to use brass screws - they won't be strong enough.
Finally, you need to insulate the sills from the chassis - use a strip of plastic or similar and hold it in place with beads of caulking goo. The original bodies used felt which wasn't very clever as it attracted moisture.
I have never replaced the frame on a steel saloon, but I guess the challenge will be to come up with a frame where the original steel pressings fit flush over it without any large gaps, and also getting the doors to fit.
Re: VG 3260
Hello Mike and Ian.
Great progress , Keep the picture's coming !
One thing , my body only had thin wooden strips between the chassis and the body????????
Wouldn't a strip of rubber be a good solution?
Regards,
Halbe
Great progress , Keep the picture's coming !
Thank's Ian for your helping remarks!Ian Grace wrote: Finally, you need to insulate the sills from the chassis - use a strip of plastic or similar and hold it in place with beads of caulking goo. The original bodies used felt which wasn't very clever as it attracted moisture.
One thing , my body only had thin wooden strips between the chassis and the body????????
Wouldn't a strip of rubber be a good solution?
Regards,
Halbe